
This article shows how easy it is to use SSH keys to stop users, or yourself, from having to use a password to gain access to a SSH session.
Why?
The first question is always …
Why should I bother with SSH keys when I can quite easily use a password?
SSH keys are more secure than passwords, as they are longer, more complex and harder to guess or crack by brute-force attacks.
SSH keys do not require you to enter or remember your password every time you connect to a SSH server, which makes it more convenient and faster.
SSH keys do not expose your password to the SSH server or the network, as they use a challenge-response mechanism that only proves that you have the private key without revealing it.
SSH keys allow you to disable password authentication on your SSH server, which reduces the risk of unauthorised access and the load of password guessing attempts.
How?
Now I’ve got you on my side, I’ll show you how easy it is to create and use these keys.
Microsoft Windows
My set-up is that I have a Windows 11 desktop that needs to connect to my IBM i.
I must generate the keys on my windows PC by opening a terminal window. Use windows search to find the application.
At the command prompt, type ssh-keygen if the command is not found you need to install the OpenSSH components from windows additional features.
If that is not easy, install the Git for Windows application which include all the SSH components you need. This can be found at https://gitforwindows.org/
Once you run the ssh-keygen command, it asks you to enter a passphrase, you can quite easily just press Enter to continue.
Once completed, it will show you the location of these keys.
This can be seen in the image below.
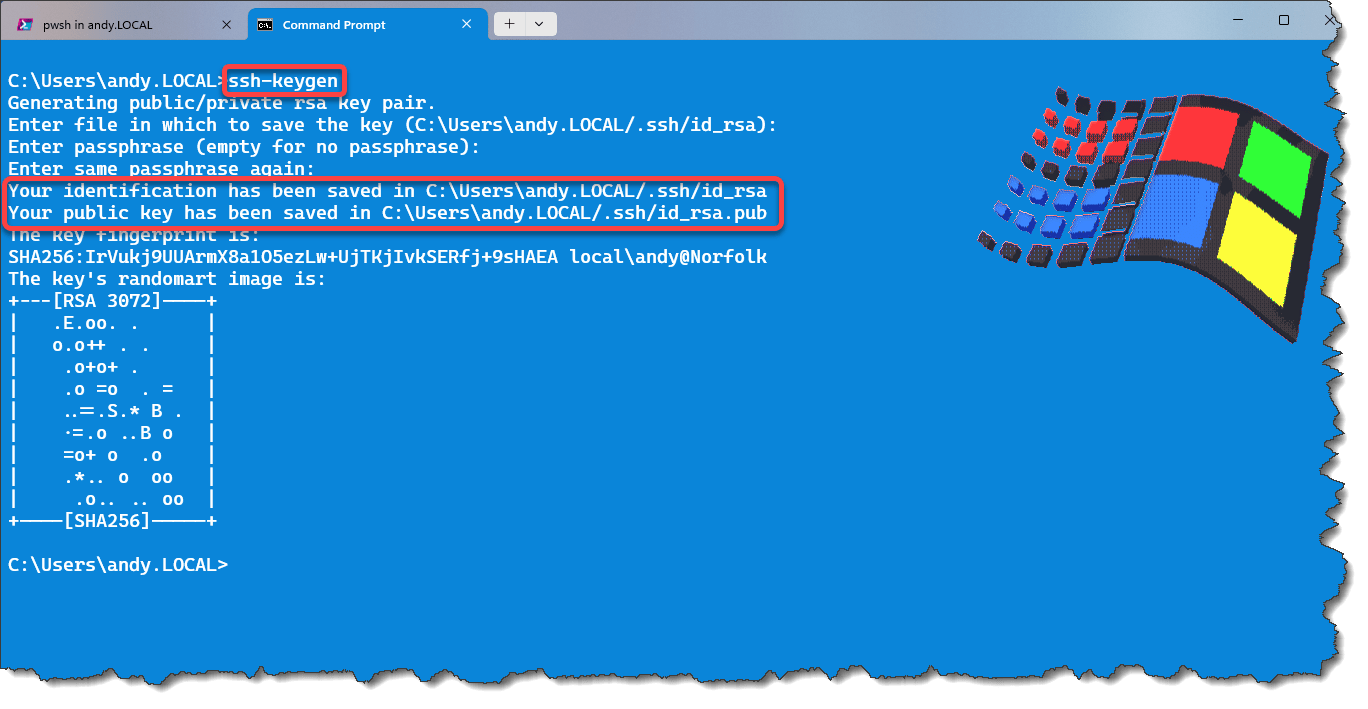
Two files have been created for us to use. They are the private key and the public key.
The private key stays on your PC and does not go anywhere, it is secret for a reason!
The public key, the one with the .pub extension has to be placed on the server you wish to connect to.
We have two options to transfer this file.
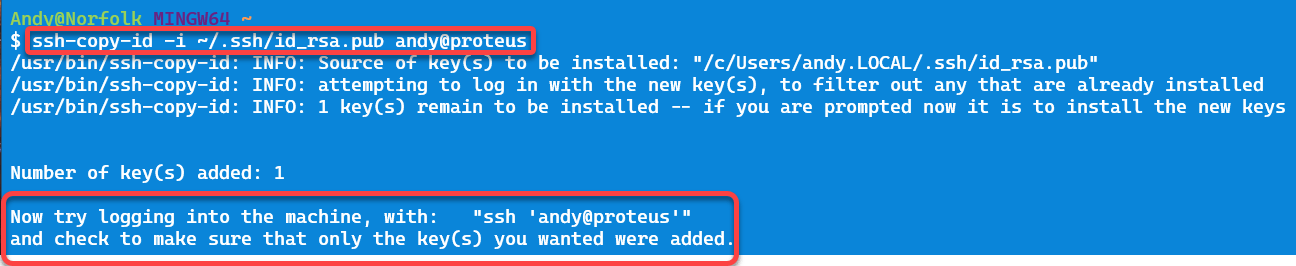
If you have Git for Windows, installed use the ssh-copy-id command, as shown below.
ssh-copy-id -i ~/.ssh/id_rsa.pub your-user-id@your-IBMi
If not, the easiest way is to use Windows PowerShell, and run the following command.
type $env:USERPROFILE\.ssh\id_rsa.pub | ssh your_IBMi "cat >> .ssh/authorized_keys"
The image below shows the output from the Git for Windows product.
And that is all we need to do.
Testing
As we would do for a password access to SSH, just type the access command of ssh user-id@your-ibmi
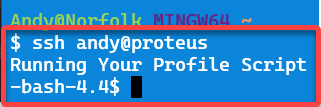
Job done!
It didn’t ask for any password, just logged me straight in. Exactly what we wanted it to do.
So, the next time I connect, it will use my public and private keys and sign me in.
Apple Mac
I have no access to a Mac. To be honest, I have never used a Mac, nor do I intend to use one, life is too short! Haha.
Maybe, there is someone out there that can provide me with the steps necessary and I will update this article and give them the recognition they deserve.
Technical Note
For those interested, the file locations are used as in the table below.
| Description | Location |
|---|---|
| Windows 11 private & public key | C:/Users/your-user-name/.ssh/ |
| IBM i | /home/your-user-name/.ssh/ |
Please note that both these file locations are called dot directories which makes them hidden.
On the IBM i, the public key is placed into the authorized_keys file.
Problems?
If when you test your connection, it still ask for a password, the most common error we see is that either files, or directories have the wrong owner or the wrong authorities.
This is easily corrected, just run the following BASH script below that FormaServe wrote to address these issues. Save this script to your IFS with whatever tool is your preferred method.
Run it from a shell session, signed on with a user with a hefty wack of authority, but just typing users.sh (or whatever you called it).
It asks for the user name to correct the owners and authorities for and will exist the BASH script if you do not input a user name.
Hopefully, this will correct the issues you had.
Technical Tip
Please note that it is important that you carry out the instructions in line 12 before running this script.
#!/QOpenSys/pkgs/bin/bash

# FormaServe IBM i Training

# For full disclaimer see https://www.formaserve.co.uk/examples.php

# © - FormaServe Systems Ltd.  1990 - 2024

# www.FormaServe.co.uk
# powerwire.eu

# Buy me a coffee if this works! - https://Ko-fi.com/andyyouens

echo " "
echo "Correcting SSH user directories & authorities"
echo " "

# prompt the user for a user name
read -p "Enter a user name: " -r user

# Check if string is empty using -z.
if [[ -z "$user" ]]; then
    printf '%s\n' "No user entered!"
    exit 1
else
    # If user is not empty show what the user typed in and run ls -l
    printf "Resetting Directories & Files for %s" "$user"

    # change the current working directory to the user's home directory
    cd /home/$user

    # is there an .ssh directory, if not create
    if ! test -d /home/$user/.ssh; then
        echo ".ssh directory doesnt exist - creating it"
        mkdir /home/$user/.ssh
    fi

    # is there an authorized_keys file, if not create
    if ! test -f /home/$user/.ssh/authorized_keys; then
        echo ".ssh/authorized_keys file doesnt exist - creating it"
        touch /home/$user/.ssh/authorized_keys
    fi

    # change the owner and group of the home directory to the user name
    chown $user /home/$user
    chmod 755  /home/$user
    chown $user /home/$user
    chmod 700  /home/$user/.ssh/
    chmod 600  /home/$user/.ssh/authorized_keys

    echo ' '
    echo 'Finished setting up user directories & authorities'
    echo ' '

fi
Leave a Reply